What is IRC?
IRC stands for Internet Relay Chat. Invented in the late 1980s, it's one of the oldest and most popular realtime chat protocols. Despite being over 30 years old, it's still actively developed, and hundreds of thousands of people still use it to chat every day.
Due to the simple, text-based protocol, it's incredibly easy to develop software to work with IRC. When I started learning how to code as a kid, all of my programming projects were IRC-related. Bots, clients, servers, games, everything! One of my games even became quite popular. If you're an IRC user, you've probably heard of the Idle RPG.
These days, there are hundreds of IRC networks, and I'm on several of them. But when I was a kid growing up in the 90s, the only network I used was Undernet.
Now, I grew up in a rural area of the southern US, and I had never been out of the South, but on Undernet, I met people in other states, other countries, even other continents! I made friends all over the world and learned a great deal about other cultures and ideas. And for the first time, I met other people who were into my new favorite hobby — programming — and that set me on the path to becoming a software engineer. So much of who I am can be traced back to the people I met on Undernet.
After 25 years, I still love Undernet, and I still chat there every day. Most of the friends I made back in the 90s aren't around anymore, but I still get to meet new and interesting people all the time, and I love the group of amazing friends I have there today. And it was one of them who suggested this project...
Genesis
It all started with a broken lawnmower.
Undernet, September 4, 2020
jotun i'm gonna go take my lawnmower engine apart and try to clean out the carburetor Telac jotun: it wont start? jotun Telac: it starts but doesn't run well, i think it's a clogged carb jet. might also just need a new spark plug jotun i've taken it apart to clean the carb before, and it worked after, so hoping that fixes it again Telac If it dies when you throttle it, it sounds like it jotun need to oil the air filter as well Ratler jotun: maybe time to change the fuel filter (or put one in) jotun ye ratler, it has one, i'll make sure it's clean
Later...
Undernet, September 8, 2020
* jotun stinks like carb cleaner and gasoline Empus hehe Shesle jotun: what happened? jotun trying again to get the lawnmower running jotun took it apart again, cleaned all the jets with a wire, soaking it in carb cleaner now
Later...
Undernet, September 9, 2020
jotun fixed my lawnmower 😎 [k] jotun: congrats! jotun yeah [k] i was so happy when it started! Shesle Oh bravo jotun, you are a real man! jotun share in my joy https://imgur.com/a/1zdF5pb Empus jotun: ^5! jotun there is nothing quite like the feeling of being master of your domain
Hoorah! After replacing the spark plug and using a thin piece of wire to clean out all the carburetor jets, it started and ran again. I'm not a very mechanical person, so this was a big deal for me 😎. However, by this time, "old man jotun" working on his lawnmower had reached meme status.
Undernet, September 14, 2020
Shesle Empus: let's link a server together to EFnet jotun i have pretty stable cable internet here, never offline for more than 3 days at a time. can i link to efnet pls Empus jotun: you should link your lawnmower there Empus that would be the best fucking server Empus slap a Pi on it, and link that thing! [k] jotun: your connection seems pretty unstable on efnet jotun omg jotun [efnet] You were killed by [k] (connection reset by peer) [k] connection too unstable to link sorry jotun jotun just wait til i get my lawnmower linked [k], you will taste the blades Empus jotun: haha strapping a Pi to a lawnmower and linking it would literally be the best server on the internet. You would win alllls of the prizes Empus please do it Empus jotun: I'm serious... this would be fucking sensational
Empus is a nut, so obviously I think this is all a big joke. But later that day...
Undernet, September 14, 2020
Empus Ragnar: have you heard that we're going to link an IRC server from jotun's lawnmower? :> Ragnar Empus: haha no Ragnar Empus: but I will happily provide a c/n for that Empus We owe it to ourselves, to build a server on a lawnmower. Ragnar jotun: lets make this happen Empus jotun: Ragnar is just as excited about this as I am. It's on!
Hard to believe this joke is still going the next day. This is a joke, right?
Undernet, September 15, 2020
Ragnar jotun: how is lawnmower.undernet.org coming together? Ragnar jotun: we are rooting for you!
OK, but they are just trolling, right? If I just ignore this, they will forget about it, RIGHT??
Undernet, September 20, 2020
Empus jotun: how is our lawnmower coming along btw? :>
This is five days later! Five days! That's like, a year in IRC time.
Undernet, September 21, 2020
Empus jotun: how is our lawnmower server coming along? jotun Empus: i kinda determined that a) area is too hot and humid to leave a computer outside, and b) mounting cheap lipos to my gasoline engine probably not a great idea Empus jotun: make this shit happen mate. Stop being a naysayer! We can do this! Empus if it gets hot and fails, we adapt Empus jotun: engineering is iterative, we'll work it out together :>
Well, I guess this isn't going away. Time to get to work.
Build
I'm a software engineer, but I haven't worked on a hardware project since I was in college 20 years ago. After lots of badgering by Ragnar and Empus, and several days of research into what might actually work, I broke down and started ordering parts.
On December 2, I ordered a RPi 4b+ 2GB and a small OLED display. It arrived a few days later.
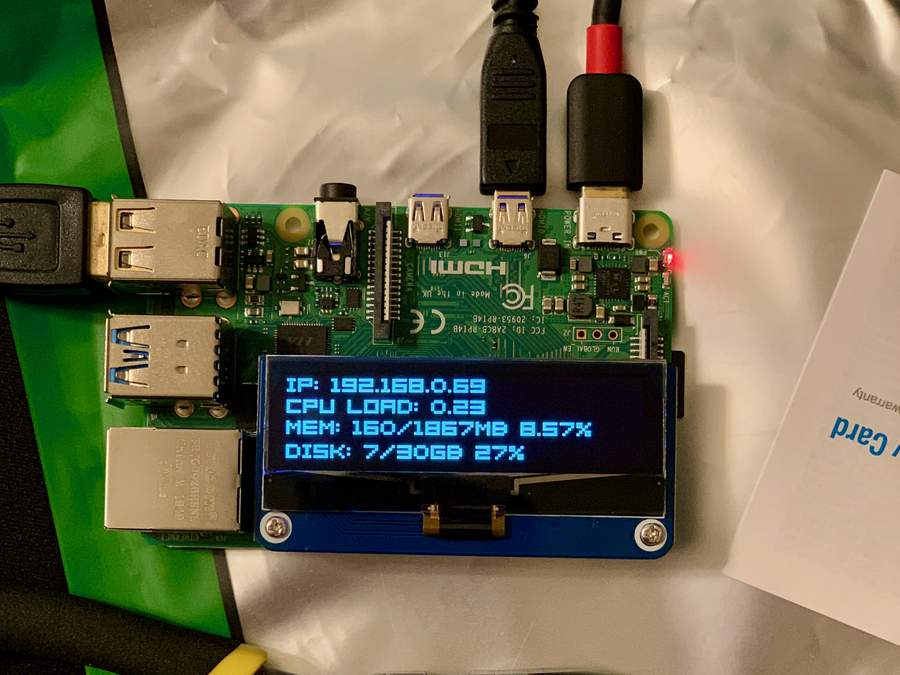
The display came with a Python driver and some example code and was quite easy to set up out of the box. The demo software showed how to load a font and draw some basic system info to the screen. Perfect, since that's what I was planning to do with it! Let's get some more data on this thing, though.
I know that I want to be able to do a WiFi survey of my yard, because if I don't have good WiFi coverage to the corners, I won't be able to stay online while mowing. So I need a WiFi signal meter. I also know that – while I'm mowing the lawn – I'll have to be running on battery power, because it's not practical to drag an extension cable around the yard. So I'll need a battery meter, too. What else can we display...?
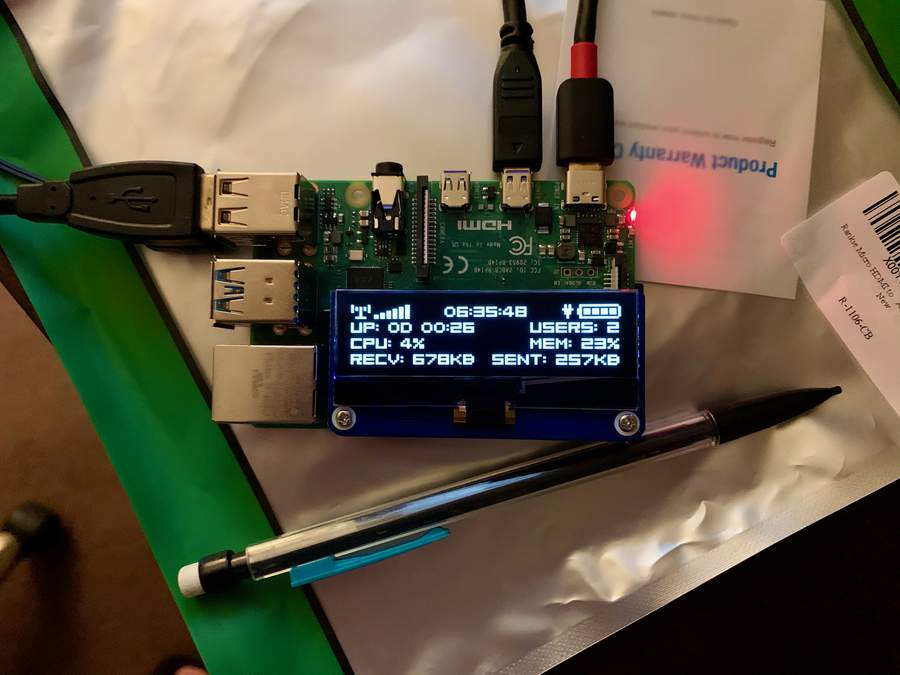
Might as well round out the top line with the current time. Uptime is good to have – good nerd stat. The IRC server software I wanted to use, ircu, built without needing any modifications, which was nice, so I got that up and running. I wrote a bot to track the IRC user count and put that on the screen. CPU, memory, and some network stats all fit, too. Looking really nice now!
Look at that CPU usage, though. That 4% is 4% of all
available CPU time. The Pi has 4 cores, and looking at
top shows that the core running our
monitoring software is the only one using any significant
CPU time, so we're using 16% of one core just to update
the screen once per second – way too much.
Profiling the monitoring code shows that we're spending
most of our time calling programs like
mpstat, free, and
iwconfig to query CPU usage, memory usage, and
WiFi signal status. It was pretty easy to get this
information from /proc rather than calling
external programs and parsing their output. That got CPU
usage down to about 6% of one core. Much better!
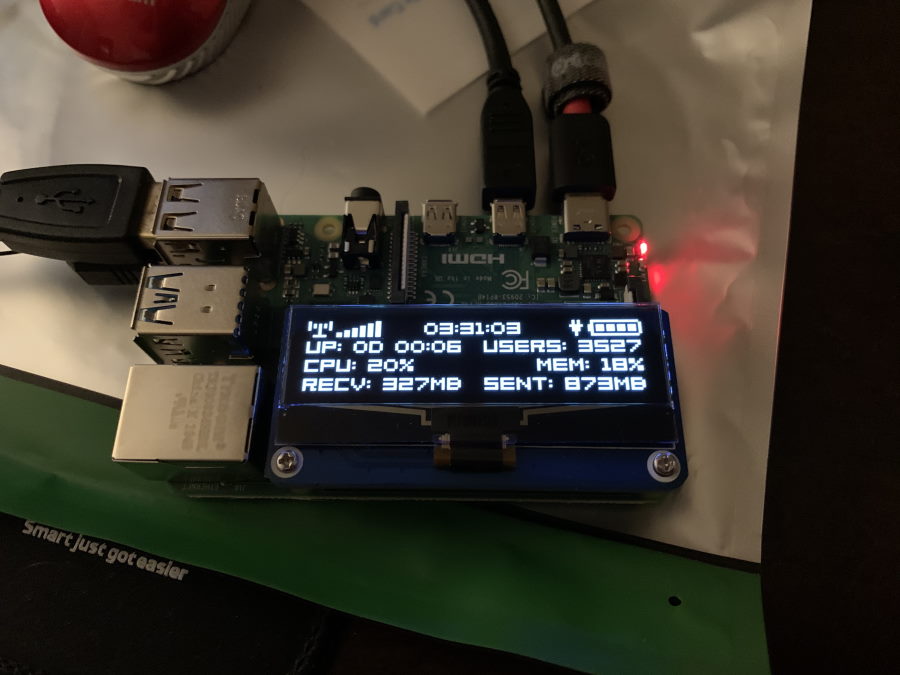
I figured I should load test the Pi running ircu to see how many users it could handle. I wrote a small program to load fake users onto IRC and have them join and part channels, send messages, etc. I reached ~3500 fake users generating 2-3mbps of traffic before my testing VM ran out of FDs. You can see that CPU usage was around 20% (well, 80% of one core) while memory usage never climbed above 18%. This is orders of magnitude more traffic than a production IRC server should expect, so I'm quite pleased with the result!
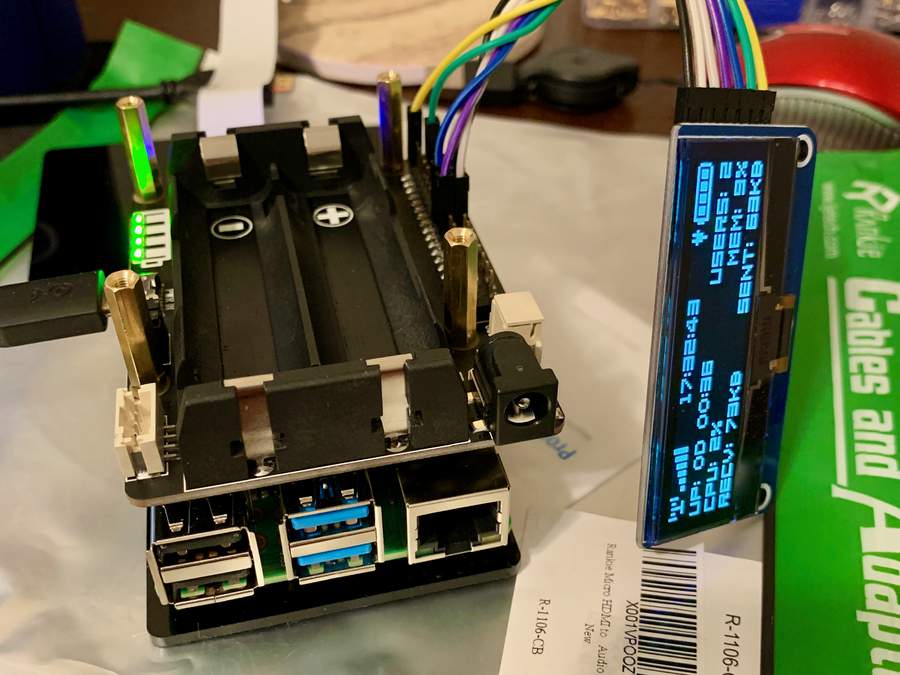
The UPS arrived, but the batteries haven't arrived yet. Notice how the GPIO pins on the UPS board are offset beyond the boundaries of the Pi? I didn't notice that in the pics when buying! The Pi won't be able to wear its little OLED HAT, or the mounting holes won't line up with the risers 🙁. I attached the display with jumper wires instead.
Also, notice the CPU usage. It's still Too Damn High! Profiling the code again showed that we were now spending most of our time in the OLED display driver, turning the bits in the backing store into bytes that could be pushed to the screen. The backing store is a 1-bit bitmap where each byte represents 8 horizontal pixels. However, reading the driver code revealed that the display expected each byte to represent 8 vertical pixels, and the driver was generating these bytes by masking off one bit at a time from the bytes of the backing store. Very inefficient!
To fix this, I used the Python Pillow library to copy and rotate the backing store 270°. Now one horizontal byte represents 8 vertical pixels, and I can read raw bytes from the bitmap and push those bytes directly to the display. Perfect!
After a few other small tweaks, CPU usage of the monitoring software is under 1% of one core. Good enough for me.
I'd been working on all of this in secret at this point. It was time to reveal it to Empus.
Undernet, December 11, 2020
jotun Empus! i have something cool for you Empus jotun: oh yeah? awesome! jotun i got this lil guy in the mail last weekend :) https://i.imgur.com/2jAsPeo.jpg Empus jotun: shit yes! it's happening jotun i didn't have batteries for it yet, but i wanted to do a wifi survey of my yard to make sure i got good coverage at all the corners jotun so i hooked up two 25m extension cords jotun and i didn't wanna touch the board with my bare hands, so i put on a rubber glove jotun so picture me walking slowly around my yard at dusk dragging a 50m extension cord and waving a tiny glowing computer around with one rubber gloved hand [k] i wish you had that on camera jotun people are walking by walking their dogs and i just smile and nod Empus hahaha Empus omg Empus dude. Telac jotun: you are one of those "creepy odd neighbours"
A good reception! Work continues...
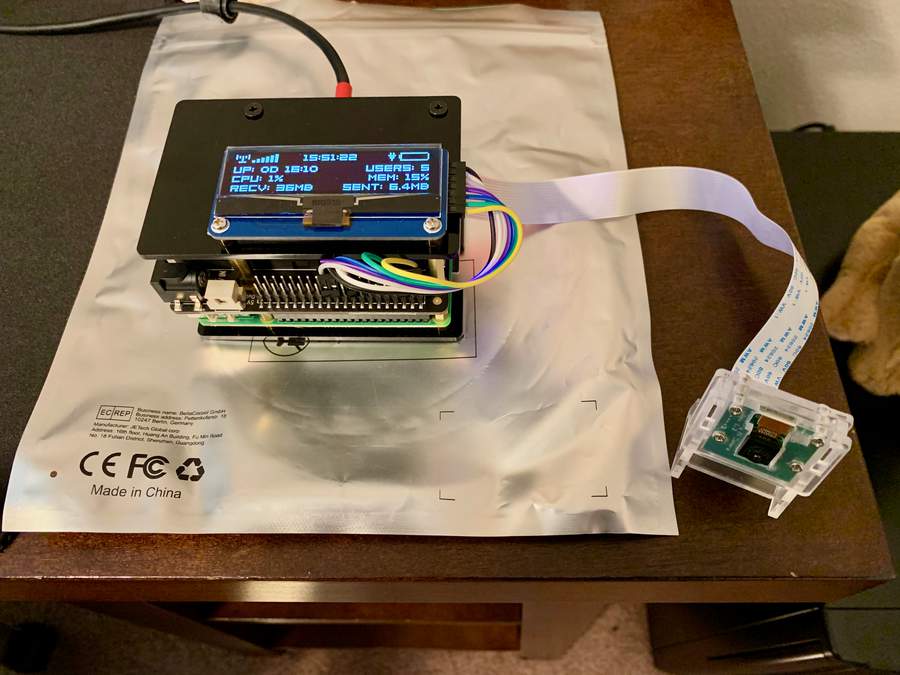
On a whim, I ordered a small 1080P camera. I had ideas of running live streams of me mowing the lawn, but due to vibrations, they haven't panned out yet.
By the way, you see all this hardware? Your cellphone has all the same stuff, but is way more powerful and takes up maybe 15% of the space. Really makes you appreciate what those mobile hardware engineers can do!
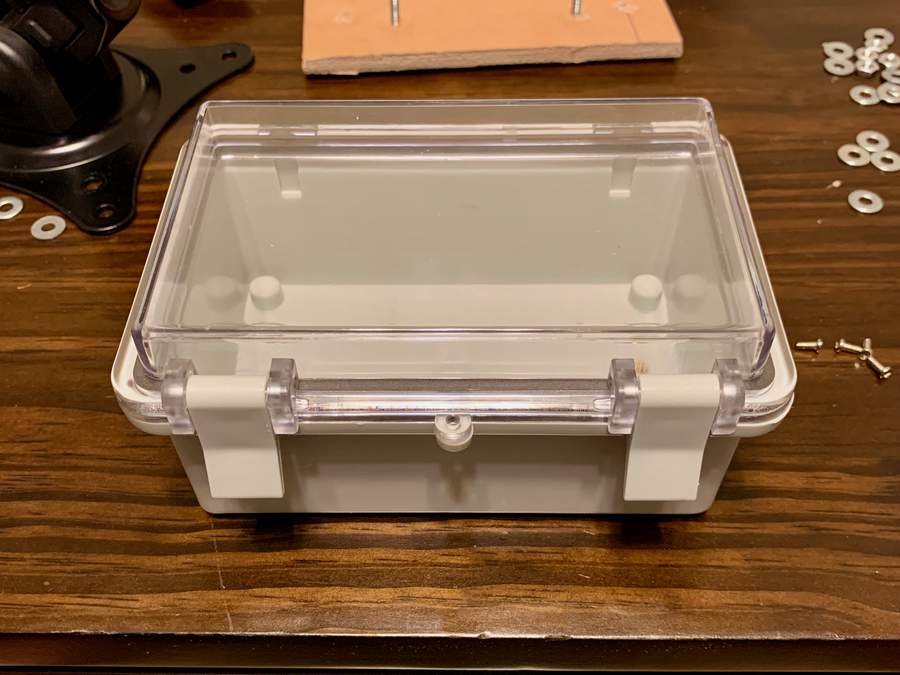
Up to now, I've still just been playing with the idea, but it's finally time to start thinking about how to actually mount this to my lawnmower. I was out of town at this point for the Christmas holidays, and I'd left all the hardware for lawnmower.* at home, but I was thinking about cases while looking at Amazon one night, and this little beauty popped up. After doing some measurements in my head, I decided it would probably fit, and went ahead and ordered it. Doesn't it look eager to have an IRC server inside of it??
That black thing to the left is an adjustable VESA LCD pole mount bracket. You can see where this is going.
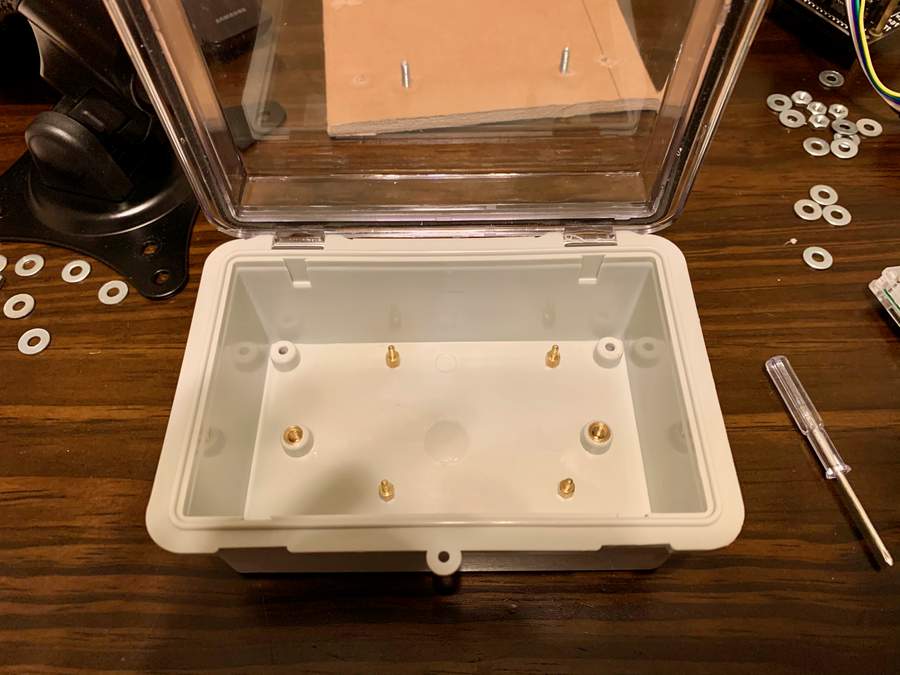
My father gifted me a cordless drill and a drillbit kit for Christmas, which was perfect, because I didn't even think about how much I'd need one for this project. I drilled holes for mounting this to the VESA mount and installed the standoffs for the Pi.
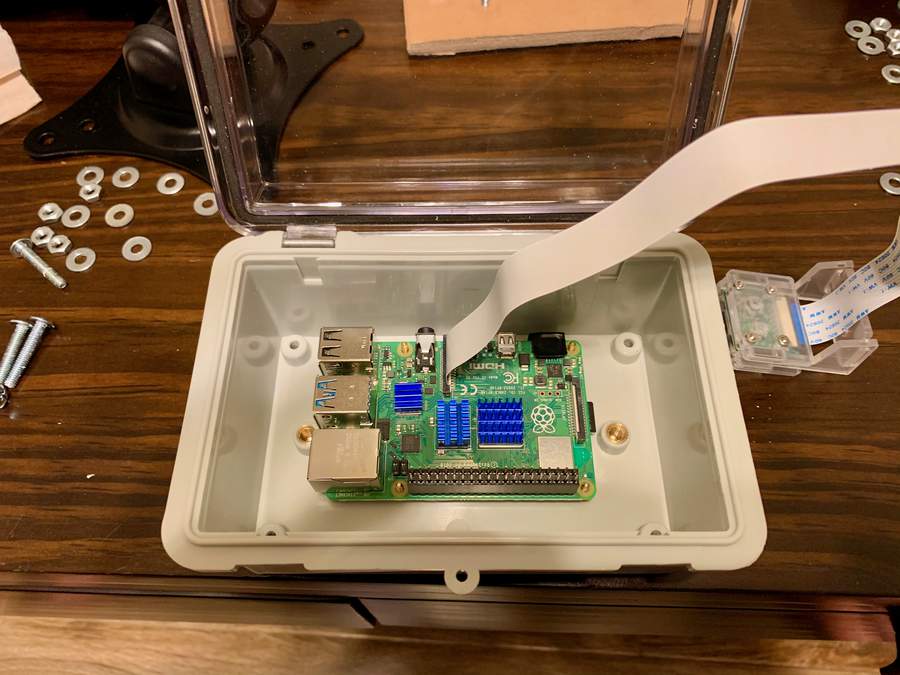
Look how nicely this fits! There's so much room for activities!
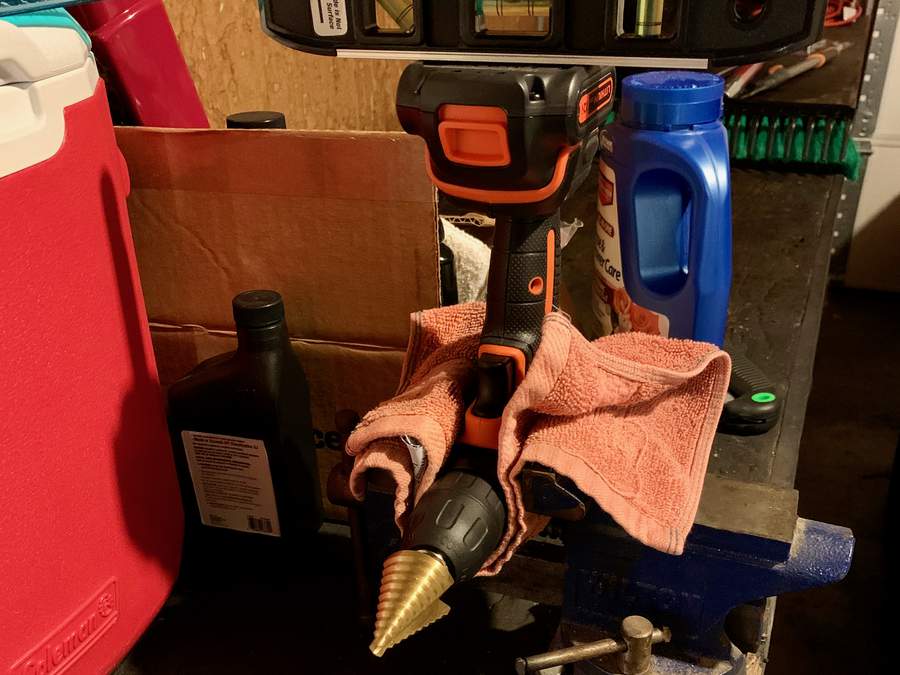
I don't have a drill press, and I didn't trust my hands to stay steady when drilling the holes for the fans, so I clamped my drill in a vice and stacked a bunch of books in front of it at just the right height. Then I set the case on the books, put a rubber band on the drill's trigger, and pushed the case against the bit.
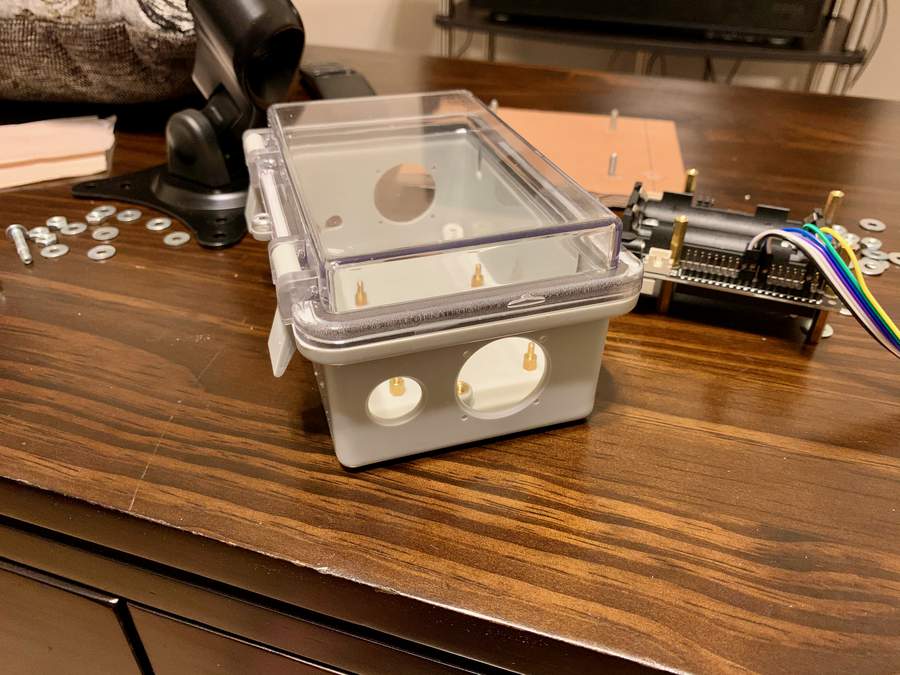
Came out pretty nice! Only... I suffered an injury. Like an idiot, I was working on this without protective eyewear. After drilling these holes, I blew into the bottom of the case to dislodge all the plastic dust, and a piece of it flew into my eye. Went to three doctors including an ophthalmologist who were all no help. Luckily it seems to have come out on its own about 6 weeks later with no permanent damage.
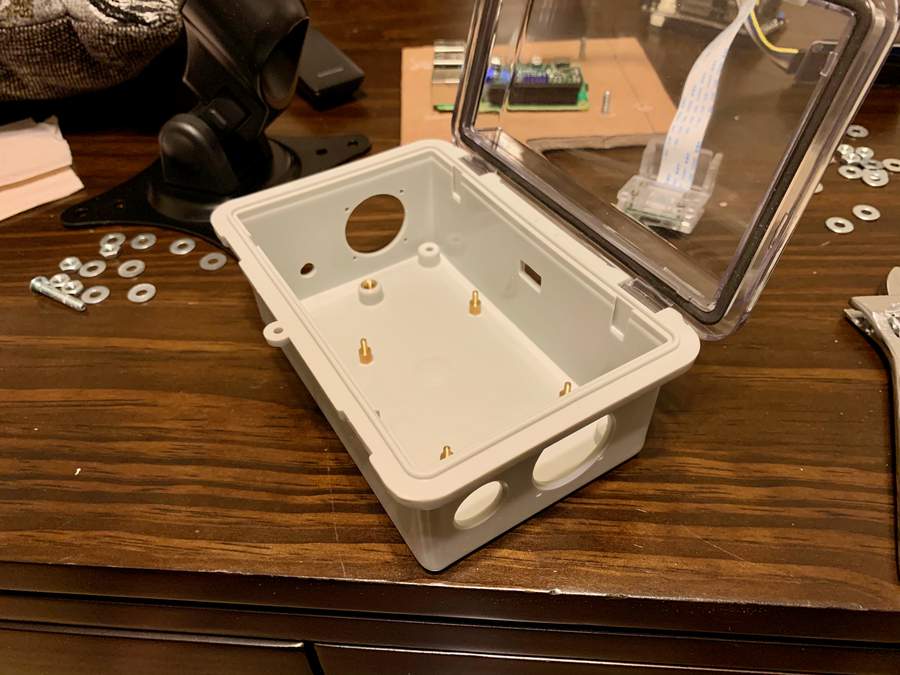
Cutting a rectangular hole in the rear of the case for the USB-C power cable was a real challenge. I didn't even own a proper file – I told you I'm not very mechanical! I ended up drilling a couple of pilot holes and then using a fingernail file to make it rectangular. Yes, really.
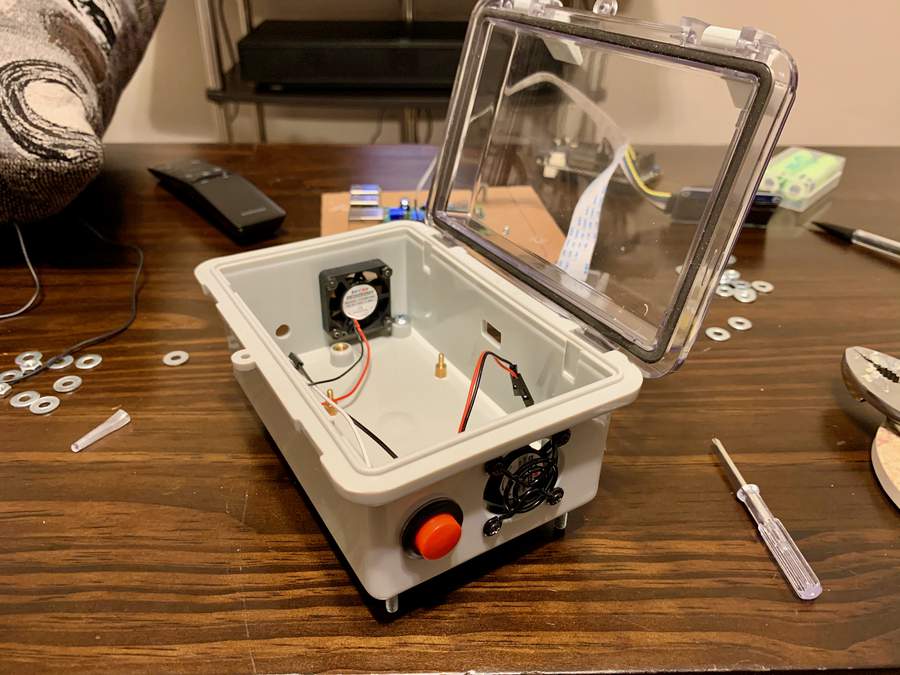
The case fans are 5V, and the Pi only has one 5V rail. I didn't want to add on a breadboard, because it'd be ugly, and I'm not really sure how I'd have made it fit. Luckily the UPS has a 5V power rail for a cooling fan at the opposite end as the Pi's 5V power pin, so I can easily put fans at both ends of the case. Man, everything is coming up Millhouse.
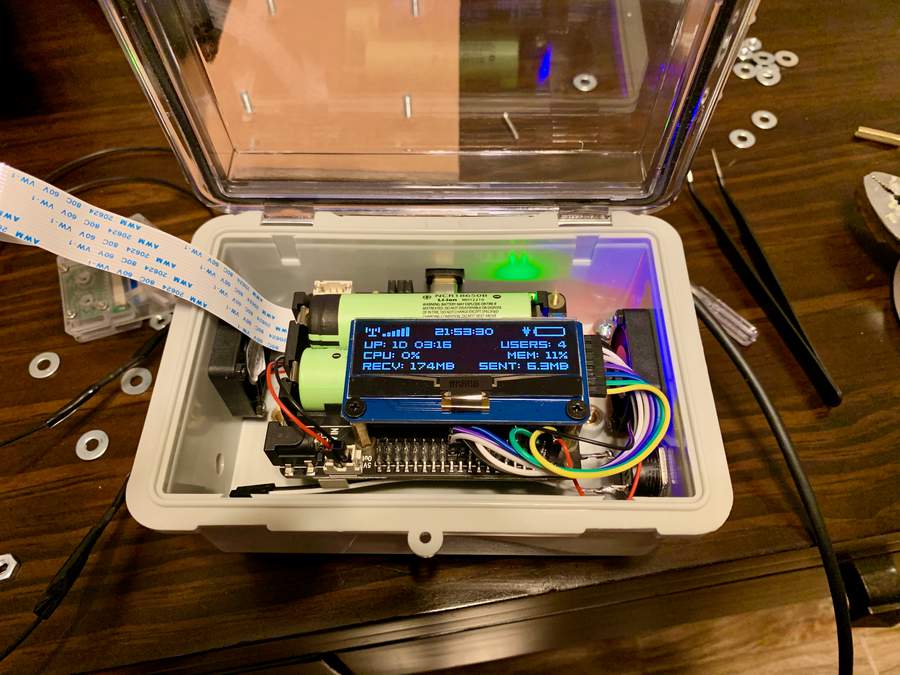
Look how well everything fits! There's just enough room for me to move my tools around and for it to get a little airflow. It's like this case was made for this!
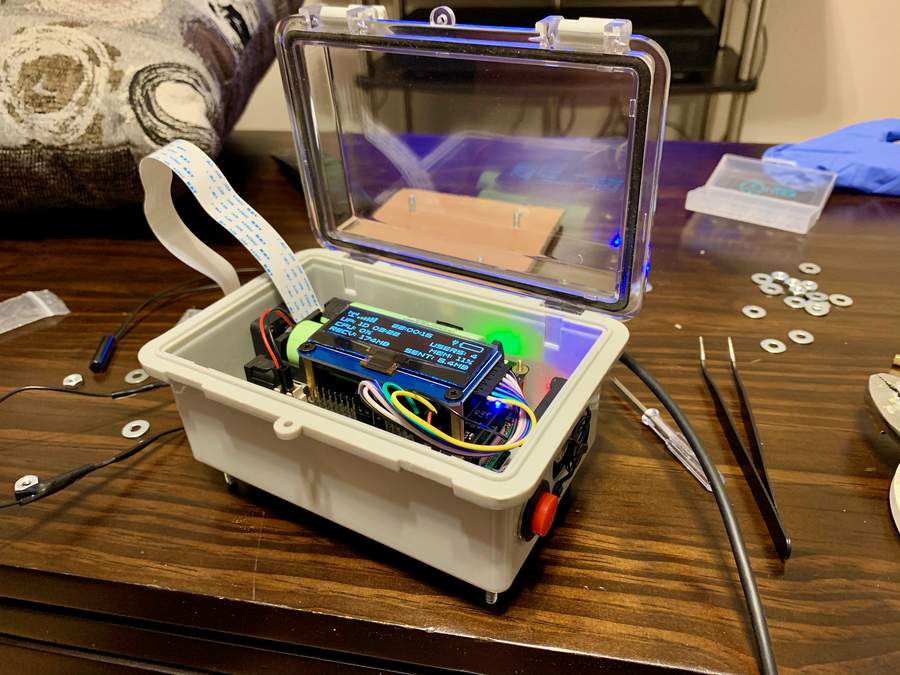
Sexy.
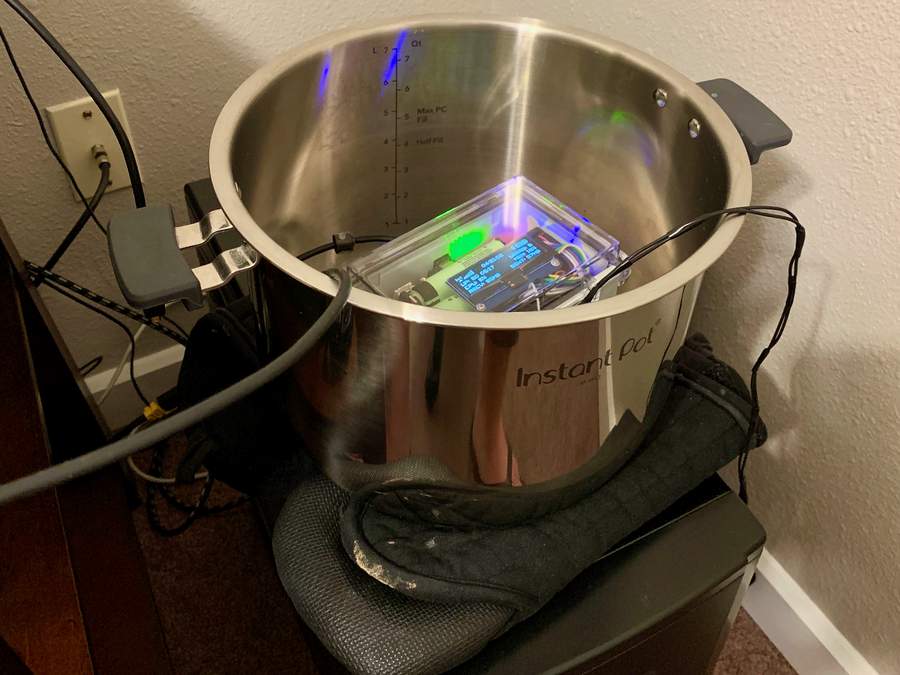
My first attempt at getting real battery charge numbers from the UPS showed it charged to... 101%?? Am I building a bomb? It was late, and I didn't really have a better option for a fireproof container, so I put it in my Instant Pot over night... just in case.
I really wanted to be able to put lawnmower.* on the internet and allow other people connect to it (why else would it have an IRC server?), but I didn't want to leak my home IP address. I don't know much about networking, so I spent a long time thinking of how to fix this and testing out different solutions.
First, I tried an SSH tunnel, which worked, but it gave all users on IRC my tunnel endpoint's IP address. That's not gonna work.
Then I considered using either haproxy with a WebIRC filter or webircgateway, both of which would allow me to pass the client's real IP along to the server, but these seemed... I don't know... unideal. Certainly this is a problem that other people have solved?!
I talked with several people about this on IRC, and I got a lot of helpful advice, and then Ragnar on Undernet mentioned a GRE tunnel. I didn't know what that was, but I started looking into it, and it's a tunneling tech that allows you to, among other things, tunnel IP over IP – that's exactly what I want! After scouring the internet for guides on how to implement this, and some late night hair-pulling, I got it to work. Clients could now connect to a VPS in the cloud and be tunneled directly to my lawnmower.
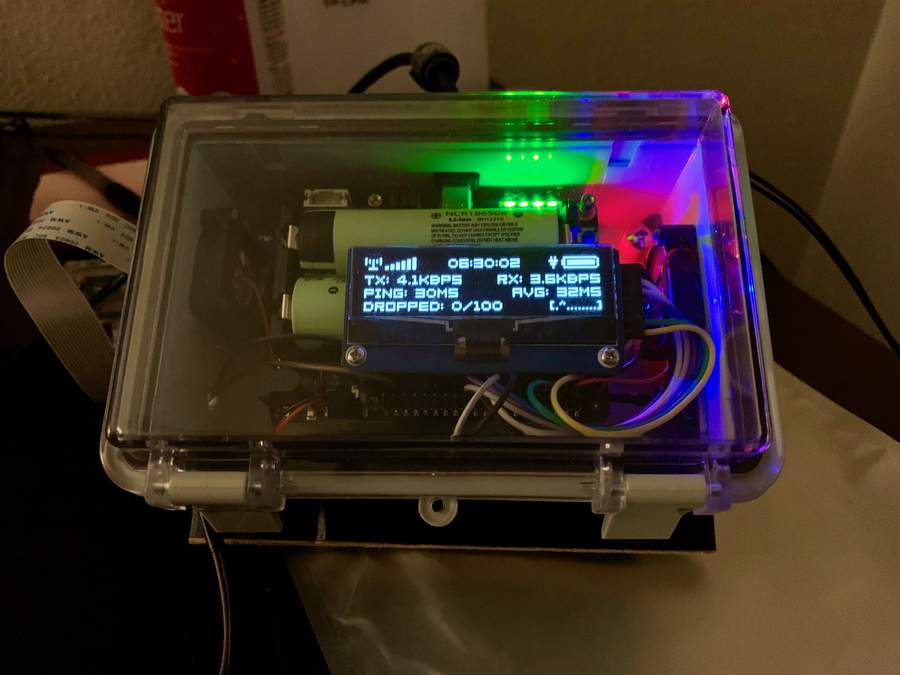
Finally putting that big, red button on the side to good use, I added a second "screen mode" – network information. This shows current data throughput, last ping time to our GRE tunnel endpoint, the average of the last 100 pings, and how many of the last 100 pings have been dropped. The little graph at the bottom right shows a dot for a ping, a caret for a ping over 100ms (3x the average), and an exclamation point for pings that get dropped.
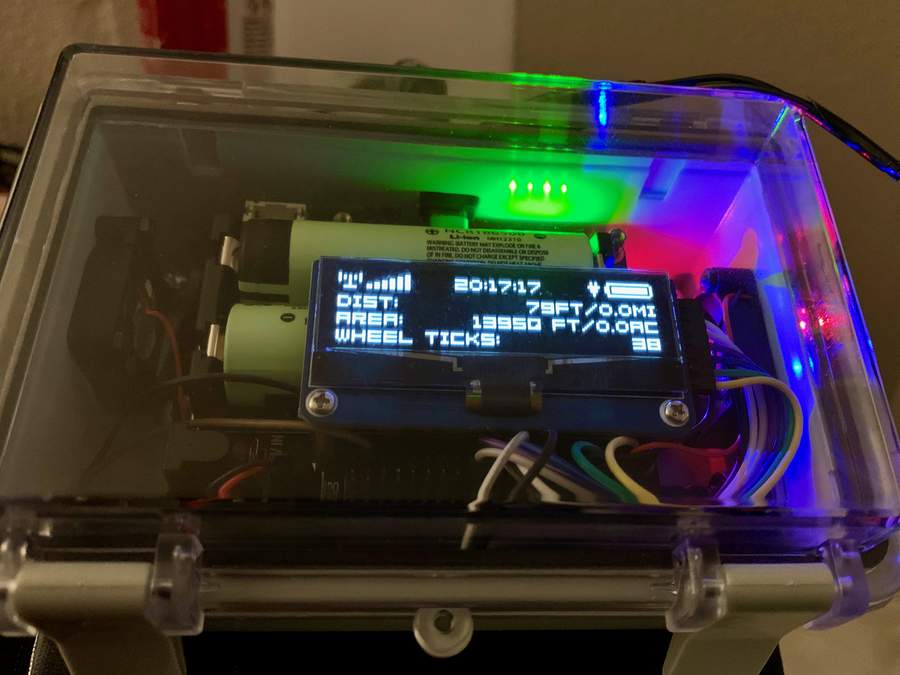
Was debating one day whether to add distance/area tracking, which seemed like a cool idea, but wasn't something I was sure I knew how to do, so I mentioned it to Empus.
Undernet, December 30, 2020
jotun debating if i wanna spend the money to add distance tracking to lawnmower.* jotun so i can see how far i've mown Empus oh god Empus where do I donate for that Empus is that a trick question?
I haven't done any soldering since I was in college, but I guess we're doing it!
I made an Amazon wishlist for the necessary hardware, and Empus promptly bought everything on the list.
Only one problem remained. The Pi has a 40-pin header of which two pins are 3V3 power. It has 25 GPIO pins, some of which are dedicated, and some of which your own programs can use for hardware I/O. If I want to attach a Reed switch to measure wheel rotations of the lawnmower, I need to connect it between a 3V3 power pin and a GPIO pin, then configure the GPIO pin to listen for events.
However, between the display and the screen mode button, I'm already using both of the 3V3 pins. What to do?
It finally came to me – the pins are GPIO pins! O as in output! I'll just set one of the free GPIO pins to be an output pin and pull it high, then I'll set another pin as input and connect the Reed switch between the two pins.
This is probably really obvious if you've done projects like this before, but as I said, I haven't worked on a hardware project like this in 20 years 😄. I did some simple math to translate wheel revolutions / ticks into distance pushed / area mown, and added a screen mode for it.

Time to mount the magnet for the Reed switch to the inside of the lawnmower wheel. A quick YouTube video showed me how to take the wheel off.
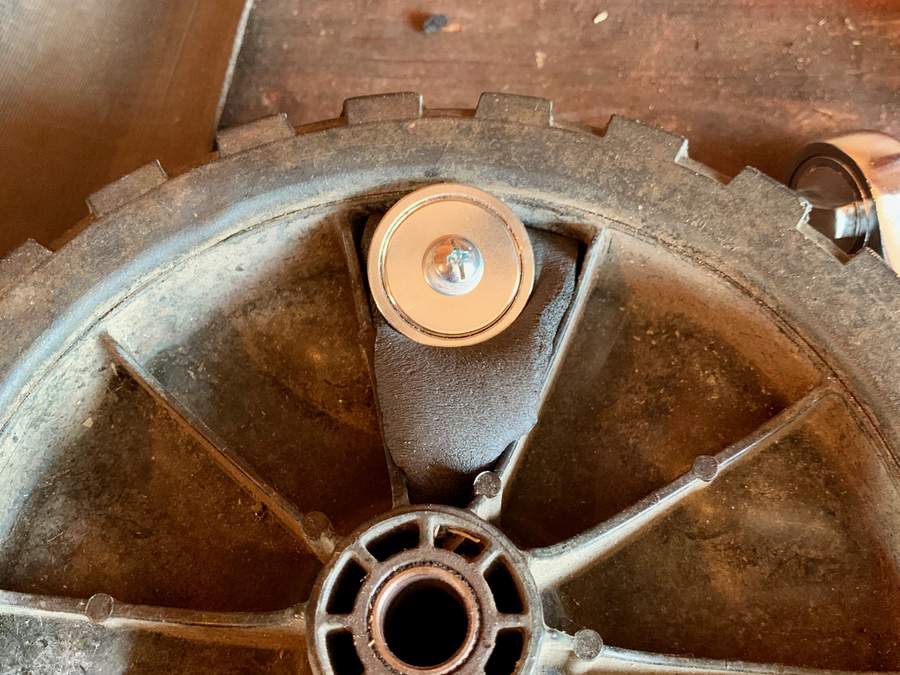
These neodymium magnets I found on Amazon conveniently have a screwhole in the center. I packed some foam rubber behind it to take up the gap and absorb vibrations.

Time to clean up my lawnmower and get her ready for pictures!

She's no Spring chicken, but she's still gorgeous to me!
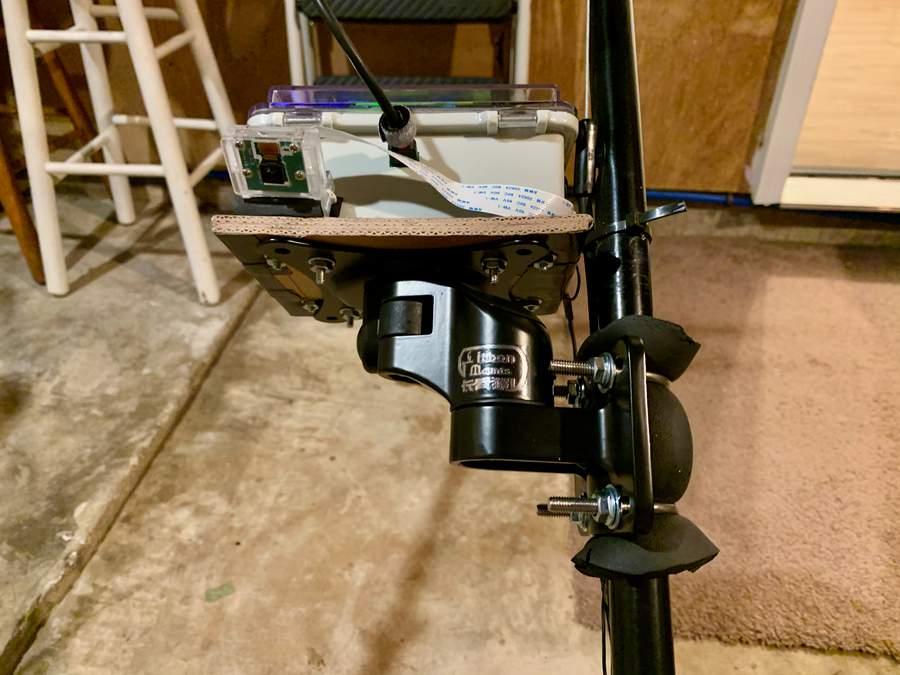
This VESA mount made for attaching an LCD panel to a pole was another Amazon find.
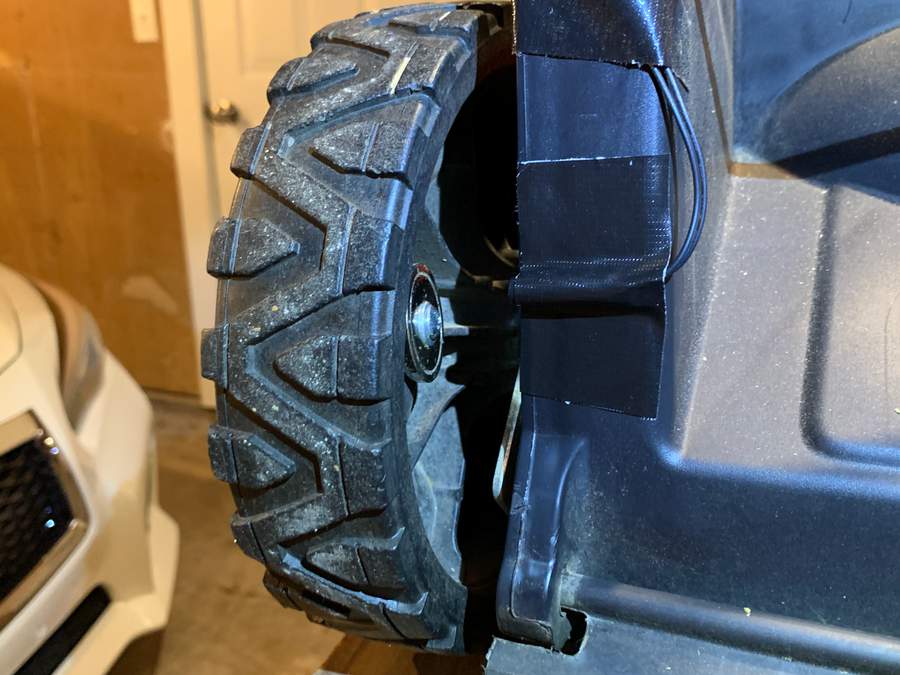
The end of the Reed switch mounted to the lawnmower frame with some Gorilla Tape. The large rare earth magnet is strong enough to trigger the switch from an inch away.
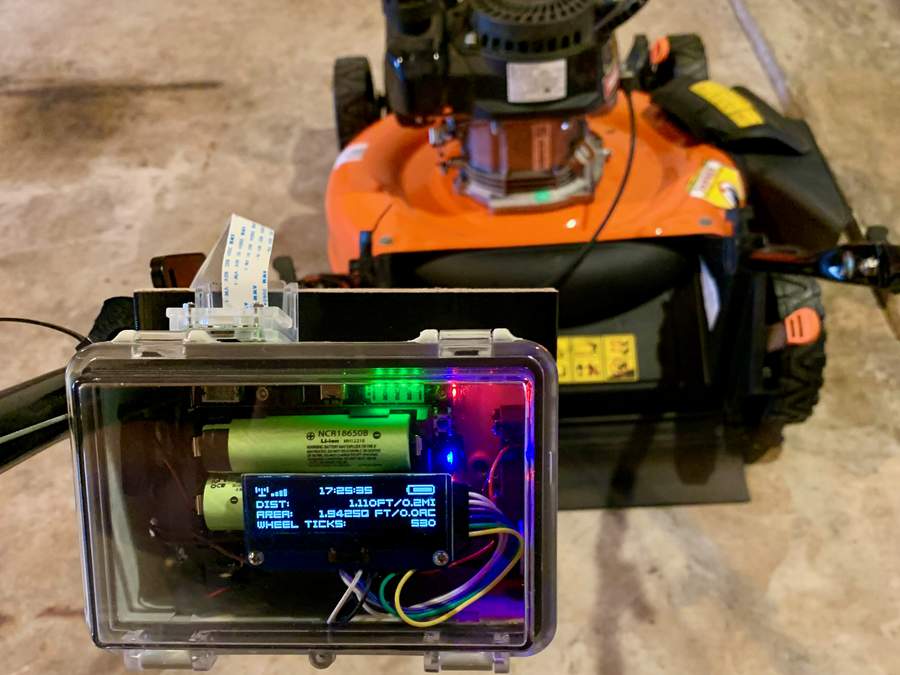
I did another WiFi survey pushing the lawnmower around the perimeter of the yard. WiFi coverage was good even at the corners! Good router *pat pat*. I used gmap-pedometer.com to verify the numbers I was generating matched the real bounds of my yard.

I can do a lot of development remotely, but for some things, you just wanna have your hands on the hardware.
In this session, I'm working on broadcasting status updates to IRC, so I want to be able to spin the wheel to simulate me pushing the mower around the yard. Here's what the IRC status updates look like:
Undernet, February 2, 2021
mowerbot 🚜 Mower started at 5:19PM! Weather: Weather: Sunny ☀️, 52F (11C), humidity 46%, cloud cover 11%. mowerbot 🚜 Mower stopped! Elapsed: 24 mins. Pushed today: 3,751 ft (1,143 m) at 1.8 mph (2.9 kph). Mown today: 0.2 acres (610 m²). Pushed lifetime: 2.7 mi (4.4 km). Mown lifetime: 0.6 acres (0.2 hectares).
Those are rookie numbers. I gotta pump those numbers up!

This is the screen after the first test mow. There's no filter over the intake fan, so the inside of the case got really dusty. The Pi will probably work fine with a little dust, because it has no moving parts, but the fans aren't going to like it. I need to make a filter.
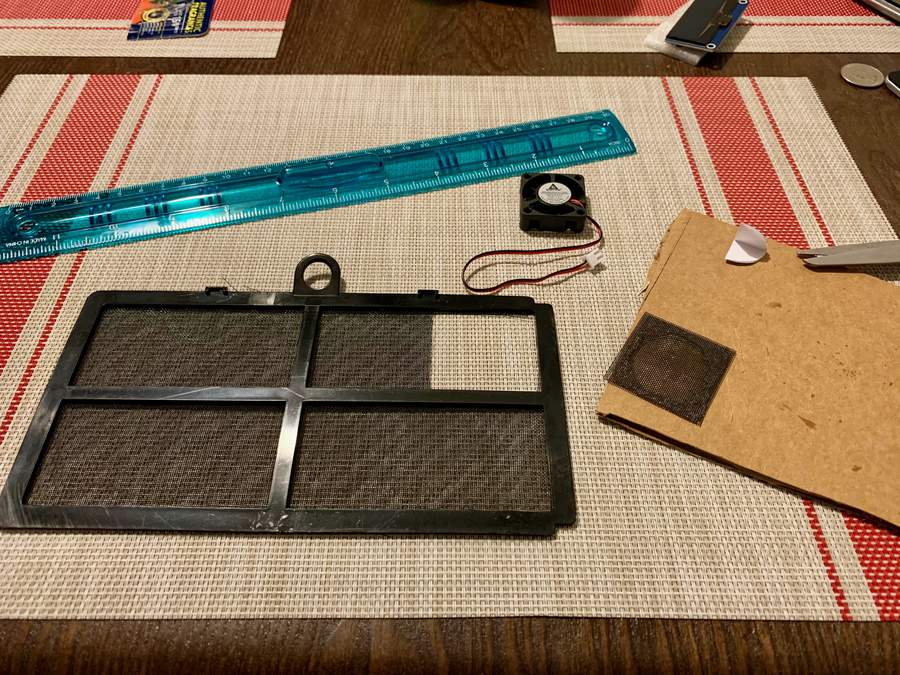
I spent a lot of time on Amazon (et al.) studying mesh sizes and trying to determine what would be a good mesh size to trap dirt but still allow airflow with a 30mm 5V fan. In the end, I realized I already have the perfect material, and I cut a piece out of my desktop's air filter. It'll be fiiiiiiiiiiiine.

I installed the homemade filter and plugged the other case holes with foam rubber. Next mow had much less dirt and dust in the case. Great success!
Here's a short sample from the first test mow with the attached camera, which was livestreamed to twitch.tv. The vibration of the mower engine combined with the rolling shutter of the camera gives this "jell-o" effect. We need some kind of hardware camera stabilizer. I don't have a good solution for this yet, but I'd love to fix this in the future.
Undernet, January 19, 2021
Shesle jotun: I watched some of your lawnmower streaming last night before bed and hallucinated the whole night :/
Sorry, Shesle. 😐

Picture taken after the first mow of the season. My neighbors have to wonder what the hell is on my lawnmower.
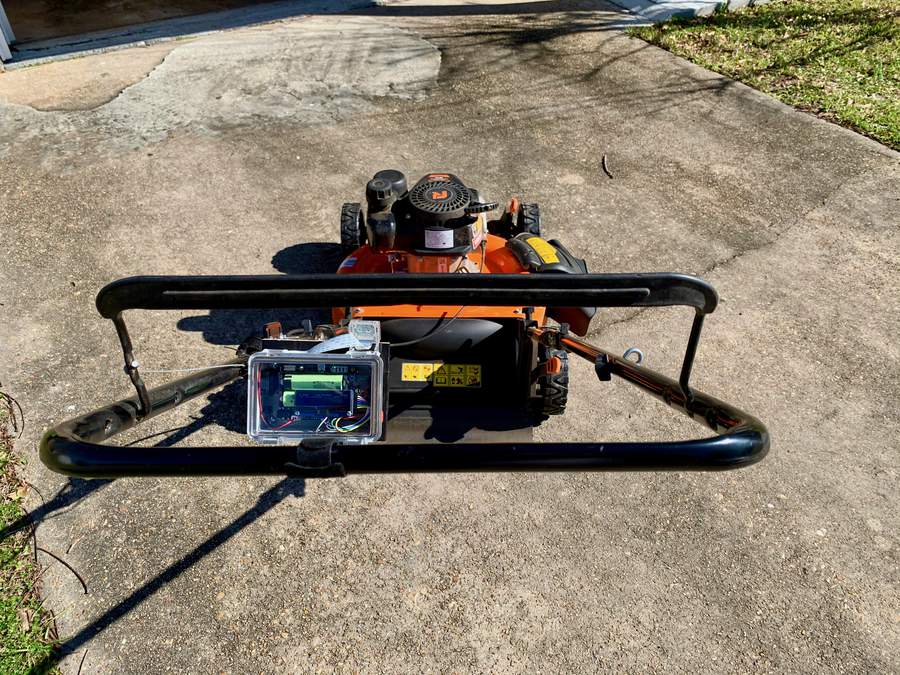
POV shot. The screen doesn't show well on the camera here, and it was hard to see in the sunlight as well. I turned up the brightness of the display before the next mow.
Here's a video walkthrough of the different screen modes, which I can switch between by pressing the red button on the right side of the case.
- System: Pi uptime, CPU usage, memory usage, disk free bytes, monthly network transfer totals.
- IRC: Server uptime, link time with our upstream hub, number of local clients (lusers), number of channel users in #lawnmower, and sent/recv bytes to our hub.
- Network: Current up/down transfer rates, last ping time to our GRE tunnel endpoint, average ping time of the last 100 pings, number of dropped pings, and the ping graph.
- Mower: Distance pushed in feet and miles, area mown in square feet and acres, and the total number of wheel revolutions/ticks.

In the middle of this project, while I was outside one day, I heard a tiny mewing sound from the woods. This little guy emerged and begged to be fed.
I'm much more of a dog person than a cat person, but this was the cutest and most outgoing and playful kitten I've ever met. I'm allergic to cats, so I talked my sister into adopting him. He loves his new home and is very happy now! 😀
If you made it this far, thanks for reading, and I hope you join us on IRC!
Join us!
If you're new to IRC, simply click here to join us in your browser!
If you're already familiar with IRC, you can connect to
lawnmower.undernet.org and join #lawnmower.
Nerd stuff
Total code written (so far!) is about 3,500 lines across 223 commits in 12 repos between December 7, 2020 and March 5, 2021. Click clack click clack!
See status and statistics about lawnmower.*.